| 1. VMAR - Covering - POLYCOTE ECS - Information & Tips |
| 1.1. POLYCOTE ECS - What is it? |
POLYCOTE ECS is a proprietary Enhanced Covering System engineered in Canada & available only from VMAR.
Quite simply... POLYCOTE ECS leads the pack in ARF covering systems! By putting the graphics where they belong... inside the POLYESTER covering... we've eliminated the need for decals and overlays and reduced maintenance to a minimum. No overlays edges to pick up, very few seams, extraordinary fuel proofing etc. With POLYCOTE ECS you will spend more time flying and less time applying and reworking the covering! POLYCOTE ECS offers the best in covering performance!
|

| 1.2. POLYCOTE ECS - Can I see the difference? |
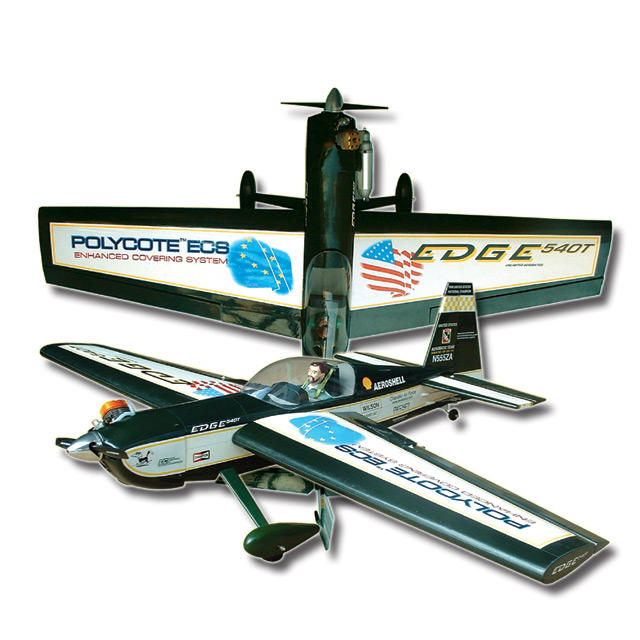
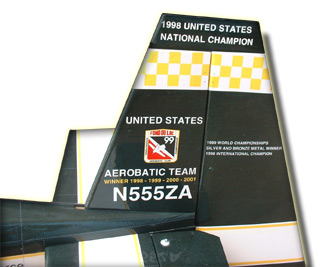
Question: With POLYCOTE ECS can I actually see the difference? Answer: You Bet! Nothing beats having the real thing to look at but even on the web you can see the difference. Check out the image below of the VMAR Edge 540T 45-60 ARF ECS using POLYCOTE ECS. Zoom it out by clicking on the image. Now look carefully at the yellow on blue star field and the stylized US Flag and you will see gradient composite colors... possible ONLY with POLYCOTE ECS from VMAR!. Check out the tail detailing (second image shown below) on the VMAR Edge 540T 45-60 ARF ECS using POLYCOTE ECS. With any other covering system this type of detail would be done using decals, overlays and stripes. Worse yet, the factory would leave it "blank" and you would have to do the tedious hours long task yourself. With POLYCOTE ECS all the graphics are inside the covering where they belong. The graphics are totally fuel proof beneath a factory applied rich deep lustre clear layer of POLYCOTE ECS! No decals! No Layers! No Strips! No Stripes! No work! Nothing to peal up, flak off or snag when you clean your model. ONLY with POLYCOTE ECS from VMAR!.
|

| 1.3. POLYCOTE ECS - Care & Maintenance Tips |
|
|
| 1.3.1. POLYCOTE ECS - Introduction - Care & Maintenance |
|
| 1.3.2. POLYCOTE ECS - Care & Maintenance - Quick Tips |
|
Question: Do you have any pointers regarding the Care & Maintenance of POLYCOTE ECS? Answer: Yes we have this Summary of Quick Tips. See www.richmondrc.com ( Enter Site > Support Services > Knowledge Base then Search on "Covering") for an expanded explanation of each Tip. Polyester offers the best in covering performance and as with any new modern technology, the maintenance methods may be different than those you used with your older covering. This is NOT Monokote or Solarfilm, its different. If you have used ORACOVER or ULTRACOTE you will have some experience with working with POLYESTER as a covering material. Here is our Summary of Quick Tips related to POLYCOTE ECS covering.
|
| 1.3.3. POLYCOTE ECS - Avoid Hot Vehicles parked in the Sun |
Question: I inadvertently left my model locked in my closed van all afternoon in the hot desert sun? Will this have any effect on the POLYCOTE ECS covering? Answer: Nothing permanent but you will likely have some sagging at least the first and second time you do this. At the risk of sounding facetious... cooking your model in your vehicle for hours on end is generally not a good idea! Temperatures can easily exceed 50C (122 F) under such conditions and if your model is stuck in this environment with no circulation for hours and hours, sagging is often the result. We recommend avoiding this type of problem. Keep the model out of situations where the temperature is extreme with little or no circulation. If it has occurred, there is no point in crying over spilt milk... if you see sagging, don't panic! BEFORE you do anything at all, please review the Tip on Tightening Sags in POLYCOTE ECS. Sagging is fixable (a whole model can be done in less than an hour) but only if you go about it properly. If you jump into this with your heat iron and heat gun assuming you know how to do this because you've fixed Monokote sags and bubbles for years, you have a high probabilty of making a botch of this and you will be stuck with a rather unpleasant result.
|
| 1.3.4. POLYCOTE ECS - Cleaning After Flying |
Question: I have been flying my model using a glow or gasoline engine. I have some oil residue on the model along with some bug guts and a bit of dirt from a less than perfect landing. How do I clean it up? Answer: To clean POLYCOTE ECS after flying we recommend Fantastic household cleaner and disposable paper towels. Wipe along seams, not across. To really show off your POLYCOTE ECS covering, after cleaning wtih Fantastic... use a bit of Armorall and buff dry & shiny. Please carefully review the following information and take particular note if you are planning on using Simple Green, 409 or similar non-approved cleaners. |
| VMAR - Cleaning Model Aircraft |
Question: I have a VMAR ARF model aircraft. What should I be aware of when cleaning it after flying? Answer: Couple of general suggestions here and a few DO NOT DO caveats. See the additional information below for more details. We recommend Fantastic household cleaner and you can dilute it 50/50 with water. Always test any cleaner on a small out of view area first. Avoid overspray on plastics. Spray cleaner lightly (do NOT flood) and wipe away cleaner and dirt/oil with disposable towels as soon as possible after spraying. Do NOT NOT NOT NOT use SIMPLE GREEN, 409 or similar materials to clean a model airplane. Additional Information: VMAR models are covered in V-Cote, POLYCOTE ECS and VCOTE-2 3DS. All of these materials are heat shrink film. V-Cote is flatter in gloss and tolerates up to 15% nitro fuel well. Higher nitro fuel can soften V-Cote graphics if allowed to sit on the surface for extended periods of time. POLYCOTE ECS is higher in gloss. VCOTE-2 3DS has a medium gloss and has 3D indentations for some panel lines and rivets. POLYCOTE and VCOTE-2 3DS can tolerate high nitro fuels and other fuel types. Always wipe away raw fuel quickly in any event. All of these covering materials clean well with Fantastic and many other household cleaners. We recommend Fantastic diluted 50/50 with water. Always test on a small out of view area first when working with any cleaner. Do NOT flood or over spray. Avoid spraying directly on plastic components and canopies. Wipe away cleaner and residue immediately after spraying with cleaner using disposable paper towels. Do NOT NOT NOT use SIMPLE GREEN, 409 or similar materials to clean a model airplane. Simple Green and 409 are good products for cutting grease and other industrial/commercial type applications but they are intended for use on non-porous materials and contain powerful chemicals that are not compatible with adhesives, balsa wood and other material found in a model aircraft. Use a web search engine to search on Simple Green and/or 409 and note the warnings and chemicals appliable to these and similar products. Do NOT NOT NOT use other cleaners having similar chemicals to those found in Simple Green or 409. Here is a link to information related to 409: http://www.biosci.ohio-state.edu/~jsmith/MSDS/FORMULA%20409%20CLEANER.htm What can SIMPLE GREEN, 409 and similar cleaners do to your model? Well... it depends. If you are not concerned about the safety aspects of these products and spray these materials on a paper towel and then use the damp towel to wipe down your model (avoid plastics) these products seem to do a good job of cutting grease and cleaning the model and many modelers like these cleaners. However, if you spray the material on to the model rather than the towel, you run the risk of the cleaner running into seams, cavities, hinge slots, covering joints and onto plastic components etc. These type of cleaners are intended for non-porous materials and if they wick or run into adhesive joints, hinge slots or under covering they can loosen the covering (this has been going on for years and modelers sometimes fight back with CA on the joint) AND react with some adhesives to soften and weaken the bond. We have also seen these type of cleaners react with adhesive commonly used to glue hinges and canopies into place and leave an ugly looking dark green stain under the covering where it has wicked further into the wooden substrate. This cannot be repaired and will continue to spread if more Simple Green, 409 or similar cleaner finds its way into the same area. We have also seen these type of cleaners attack plastic... generally the plastic does not dissolve or soften, instead it gets dry, hard, brittle and will over time crack and flake off. In summary it would be best to use the cleaner and the techniques we recommend. If you are fond of your particular cleaner then at least make sure you follow the techniques we have outlined above. Test first. Do not flood or overspray. Wipe away quickly. Best to spray on the towel rather than the model. Make sure no cleaner can get into the model substrate such as the balsa or plywood materials... stay away from hinge slots, seams, cavities, joints, adhesive bonds etc. Protect plastics from direct contact with cleaners and/or long term exposure to cleaners. Related Articles: For each type of covering we use, there may be additional articles related to cleaning that particular covering. To check for Related Articles please use the Search tool near the top left of the Knowledge Base window and search on the word "Clean". Type just the letters Clean (clean) into the search box and then click on the button marked Search. The search tool will return a list of articles having "Clean" in the header or body. We suggest reviewing the articles related to the covering on your particular model.
|
| 1.3.5. POLYCOTE ECS - Cleaning Initially |
Question: I have my model all assembled and have a few streaks or other residue on the POLYCOTE ECS covering. How do I clean these off. Answer: POLYCOTE ECS has very few seams and we use our SURE SEAL system to really lock the seams down. Upon initial inspection if you see a thin streaky film on any of the POLYCOTE ECS when looked at under bright light this is a light residue from the SURE SEAL process. It is easily removed using Minerial Spirits (Paint Thinner, Varsol). If you've ever painted with oil base paints you probably have Mineral Spirits on hand already, if not, it is readily available at a paint or hardware store. It is recommended that you work with Mineral Spirits outdoors and follow the directions on the container. Use a paper towel and wipe a slightly wet film of Mineral Spirits over 1/4 of a wing or half a fuselage at a time. Rub gently while still wet. Change towels frequently. Use a clean towel to buff dry. If you want to accentuate the deep "clear cote" gloss of POLYCOTE ECS even more, use a bit of Armorall and buff shiny with a clean paper towel. Discard all soiled paper towels into a metal garbage can stored outdoors.
|
| 1.3.6. POLYCOTE ECS - How to Cut. |
Question: POLYCOTE ECS is tough stuff! How do I cut it? Answer: POLYCOTE ECS is made from Ultra Tough Polyester. Where possible, use scissors to cut POLYCOTE. Scissors work well. Otherwise use a new sharp #11 Blade. The blade must be SHARP.
|
| 1.3.7. POLYCOTE ECS - Pealing - What should I do? |
Question: I've been flying my VMAR model for a while and notice that a small area of covering appears to have lifted at an edge and looks like it is pealing back. What should I do? Answer: Don't panic! This is generally repairable. This can occur in two ways. a) If the color layer is still bonded to the underside of the clear polyester layer, use a heat iron and soft heat iron sock to iron the loose layer back into place. If the seam is on a curve such as a leading or trailing edge or at the edge of a cutout like a servo cavity, you might want to wick thin CA along the exposed seam after you have reseated the covering to ensure the edge does not pick up again. b) If the color layer has remained on the model and only the clear polyester layer has pulled away, you can try the same method as outlined in a) above but you will need more heat to rebond the clear layer to the model. If this does not work, you can either remove the clear layer where it is loose and recover the exposed section with clear UltraCote (UltraCote is made also made from Polyester) or you can apply a thin coat of latex contact cement (spray on works well) to the exposed area and the underside of the clear loose film and after the contact cement has dried to tacky, firmly press the loose film back into place working towards the edge. Work slowly and wipe back and forth as you press downwards. If you do do not have access to contact cement you might want to try a product called Balsarite from Coverite products which is specifically made to help increase the bond strenght between most coverings and balsa wood. . Seal the edge with CA as outlined in a) above.
|
| 1.3.8. POLYCOTE ECS - Protecting the Finish - What should I do? |
Question: I've been flying my VMAR model for a while and it looks great. Is there anything that I need to do protect the finish to ensure it lasts. Answer: POLYCOTE ECS is pretty tough stuff and does not need kid glove handling. If you do the following you should get good durability for the life of the model.
That's about it. Nothing to really sweat over... basically common sense.
|
| 1.3.9. POLYCOTE ECS - Removing & Using Tape |
Question: Some of my control surfaces have arrived from the factory with tape holding them in place during shipment. Is there a correct method for removing the tape. Answer: When removing tape from POLYCOTE ECS (or any covering for that matter), peal the tape back on itself so that the pulling is parallel to the surface of the covering. If the tape is near or across a seam or an edge, peal towards the edge or seam. Do NOT pull the tape up at right angles to the covering or away from a seam or edge. If you use your own tape during the assembly process, use a low tack masking tape and remove it using the procedure noted above.
|
| 1.3.10. POLYCOTE ECS - Repairing Punctures - How to Patch. |
Question: I have a puncture in my POLYCOTE ECS. How do I patch this? Answer: If you puncture POLYCOTE ECS, clean any oil residue from the area of the puncture. We clean using Fantastic and then a paper towel moistened with Pacer De-Bonder or alcohol or water to remove any remaining residue from the surface. The patch should be 1/2" (13 mm) bigger than the hole on all sides. It may be difficult to match colors or patterns. When you run into this challenge, you might want to take a different approach. Rather than try to match the color or pattern, deliberately use a black white or silver patch and cut it into the shape of a panel hatch. Detail this with lettering and a perimeter line and it will look like the hatch is supposed to be there. Another trick is to cut the patch into a shape of a letter, flag or aircraft marking. We recommend using after market POLYCOTE patching material or polyester covering such as POLYCOTE, ULTRACOTE or ORACOVER and the use of a heat iron and soft cloth. Monokote, SolarFilm or V-COTE covering material will also work. Cut the patch with rounded corners. Seal the patch in place with a heat iron set at 250F first and then tighten the patch and the original covering around the patch as outlined in the tightening tip. You may need to experiment a bit with the temperature of your iron depending on the patch material you are using. To repair larger more extensive damage areas, you may wish to obtain the appropriate POLYCOTE ECS covering set for your model
|
| 1.3.11. POLYCOTE ECS - Seam Loose - How to Reseal. |
Question: One of the seams on my model has come loose. What have I done wrong? What should I do to reseal it? Answer: Although we are very careful to tack all seams down and then to seal them as well, we are not perfect (although we're trying!) so the loosening of a seam may not be due to anything you are doing. Once a seam is in place properly we advise being very careful when cleaning the model to avoid wiping across the seam... wipe parallel to it. There are very few seams on VMAR models. Generally seams are located at:
If you do have a loose edge, clean any oil residue from the area and the edge and reseal with thin CA.
|
| 1.3.12. POLYCOTE ECS - How to Tighten Sags |
Question: My model is covered with POLYCOTE ECS and I have noticed that there are some sags in the covering. What is causing this? Can I fix it? What should I do? Answer: It helps to understand how the sags develop before we get into tightening things up to get rid of the sags. In low humidity air such as is found in the hot desert areas or in continental winter conditions where cold outside air is brought inside and heated to 22C ( 70F), the underlying structure is drying and shrinking. Many modelers feel that the sags are caused by heat and to a point they are correct because hot conditions are often dry and most definitely heat is the key to solving the problem. However, the real underlying cause is low humidity air drying the structure out and as the structure drys it gets lighter and smaller. POLYCOTE ECS will not shrink at normal room temperatures and you end up with, in effect, more covering on your model than you need! The way to get rid of the sags is to shrink the POLYCOTE ECS with a heat gun and rub it down into the substrate with a soft cloth once it has shrunk. Before you start firing up your flame thrower, please note the following procedure... if you get the method down pat, you will get a good result and not have to do this more than 1-2 times... 3 times at most. However if you assume that POLYCOTE ECS is like Monokote or SolarFilm, you will make a hash of it and you will not be happy with the outcome. POLYCOTE ECS is polyester and the technique for shinking it is similar to that used for ORACOVER (ULTRACOTE).
First, SECURE the perimeter by sealing and bonding the seams, edges and around perimeters. Use a heat iron with sock set at around 250F and a soft cotton glove or sock. Heat the perimeter edge in stages, just warm up a small area and then press the warm covering down firmly with the iron sock or a soft cotton cloth to bond the perimeter of the covering to the underlying substrate. Do not overheat or the edge will pull back as the material shrinks. Always rub along seams, not across the seam. Higher temperatures may assist with complex curved surfaces. Avoid using more heat than required to prevent bubbles from forming beneath the covering or edges pulling back as the material shrinks. Remember you are just SECUREing the perimeter at this point. Be patient and work systematically starting with a small out of the way area first to gain experience. AFTER SECURING the perimeter, SHRINK the interior areas to fit, using a heat gun set at around 250K. Heat about 1 square foot of area at a time, shrink the covering to fit and then rub the warm covering down firmly with a soft cotton cloth to BOND the covering to the underlying substrate. Over open bays the POLYCOTE ECS will appear to first sag and then begin to tighten as you apply heat. Do this in stages and try repeatedly until the covering over the open bay is tight when cool. Don't overdo it... like may things, there is a technique to this that requies a bit of experience to develop. Go slowly one step at a time. Higher temperatures may assist with complex curved surfaces. DO NOT APPLY EXTENSIVE HEAT NEAR EDGES & SEAMS. Always practise on the bottom of a less noticable section first. Be patient and work systematically. You will likely only have to tighten POLYCOTE once or twice to accomodate any shrinkage of the airframe in dry hot conditions. To prevent or at least minimize the occurence of sags do not leave your model in a closed car parked in the sun. Here is some information that may help you avoid this problem. |
| 1.3.13. POLYCOTE ECS - Tools - For working with POLYCOTE ECS |
|
| VMAR - Covering - Tools - Recommended |
Question: What would you recommend in the way of tools for working with Covering materials? Answer: Here's a list of what we would suggest:
Please note that the heat gun is particularly important. Unfortunately the standard RC covering heat gun has been driven down in price so that it is selling at times for usa$14.95-19.95. We say unfortunately because at that price we are getting exactly what we are paying for... a pretty crude unregulated heat producer. Even a decent hair dryer costs more! Most of these low end RC covering heat guns do not monitor the heat coming out of the nozzle. They have a heating element that heats the air sucked into the back of the gun and a fan that blasts it out the front. The vanes at the back of the gun have a very limited effect on the output temperature. So... if you take a 1000 watt gun for example, and heat air that is at 50F flowing into the back of gun you get a fixed amount of temperature increase... lets say 350F and the outflowing air is at 50+350=400F. Now run the same gun with ambient air of 75F flowing into the back of the gun and the same 1000W of energy will increase this 75F air by 350 degrees to 425F. So depending on the ambient air temperature you get a different output temperature. To add to the confusion somewhat, adding a fixed amount of energy to dry air (low humidity) will change the temperature of the air more than if you add if you add the same amount of energy to moist (high humidity) air. This variation in output temperature due to changes in the ambient air and ambient humidity makes it very difficult to work out a reliable consistent technique when you are working with heat shrink covering. One day you get a "feel" for the right amount of heat, time and distance and everything goes great. The next day or a month later you try this with a different ambient air temperature and/or different humidity and your technique does not work... why? Because the temperature of the air flowing out of the gun has changed without you being aware of it. What can you do about this to make your covering technique more consistent? Well sadly to say you either have to live with this problem or you have to dump the cheapy RC covering heat gun and get a heat gun that measures and controls the consistency of the temperature of the air flowing out of the gun. There are a number of heat guns for shrinking heat shrink tubing that work well. They can be rather expensive but give you good control over the temperature you want AND hold that temperature consistently regardless of ambient temperature and humidity. It's nice to be able to select the temperature if you've got the cash to buy such a gun. If you need to watch your pennies a bit more carefully, we suggest opting for less control and go for consistency. Some of the lower priced heat guns intended for stripping paint do this. You will need to work out the distance and time technique that works for your covering but at least you will be doing so with a gun that is producing a reliable temperature output. We have used the Black & Decker #9756 with good results. This has two temperature settings, 500F and 1000F. Read the safety instructions that comes with the unit. Work with the 500F setting at a good distance at first (say 15") and move the gun frequently until you get a feel for it. Generally the closer you get and/or the hotter the air coming out of the gun, the quicker you have to move the gun (less exposure time) to avoid overheating the covering.
|