| 1. VMA-B210X Bird Dog 06-12 ARF - Additional Information |
In general "Additional" Information is:
Subject to the Conditions of Use, please review the attachments and related articles listed below. |
| COPYRIGHT |
Copyright Richmond RC Supply Ltd. All rights reserved.
|
| 1.1. VMA-B210X Bird Dog 06-12 ARF - Electric Power Systems for Flight at High Altitudes |
For those of you who may be wondering about flying a VMAR Bird Dog at High Altitude please see the general article on high altitude electric performance included further below.
|
| Electric Power - Performance at High Altitudes |
Question: I live at 5000 feet above sea level. What should I do to get my electric power system to perform at high altitudes as well as it does at sea level? Answer: It's tough to get the same performance at 5000 or 8000 feet as you do at sea level but we do have a technique that will help you come close. First of all it's important to understand a few things: 1) Unlike an internal combustion engine (i.e. glow or gas), an electric motor does not consume oxygen and hence could care less about oxygen or anything else that affects combustion. 2) An electric motor system that runs well at sea level will underperform at higher altitudes not because the air has less oxygen but because the air is thinner. Hot weather does the same thing... the air gets thinner. Hot and high together can really gang up and take a chunk out of the performance. In order to get your electric motor system to perform in thinner air the same way it does at sea level, you may actually have to change the motor, speed control, battery pack and prop but before you go reaching for your credit card here is a technique that attacks the problem from the lowest cost component first.
Be cautious when testing to ensure that the motor, ESC and battery do not overheat with the new prop. Some compromising may be necessary to get good performance that does not overheat components. In a perfect world, you would carefully select a specific motor, ESC, battery and prop to get the ideal combination for high altitude performance when installed in a particular model. Yup... perfect is best... but for those of us who can settle for a bit less than ideal and have limited budgets, changing the prop to generate similar thrust in high, hot & thinner air as you get in low, cool & thicker air is a good low cost way to go.
|
| 1.2. VMA-B210X Bird Dog 06-12 ARF - Stage 12 Installing Electric Motor and ESC - Step 12C Mounting Screw (Bolt) Set |
Question: Stage 12 Step 12C of my B210X Manual refers to installing three bolt and washer sets for mounting the motor. These bolt sets are stated to come with the kit but I did not get these in my kit. What's the story here?
Answer: The reference to the bolt sets (mounting screws) in your version of the B210X Manual is incorrect. The motor mounting system was modified to use four mounting screws not three as stated. These mounting screws come with the Power Module and Power Pack but are not included with the kit. Each motor is different and requires different mounting hardware and methods. We do provide a blank firewall set that can be drilled to suit nearly all motors. |
| Mounting Screws - What to use on VMM-111B18VM VMAX Brushless Motor |
Question: I have a VMAX #VMM-111B18VM VMAX Brushless Motor. What do I need in the way of mounting screws? Answer: There are a several options for this depending on what you have in mind:
CAUTION: When mounting motors using any method, ensure all fasteners are tightened securely. Check for vibration free operation of the motor. If not vibration free, reseat and retighten all fasteners and ancilliary components such as props and gears. Tighten fasteners firmly but don't strip the threads. Use medium strength thread locker on all metal to metal fasteners.
|
| 1.3. VMA-B210X Bird Dog 06-12 ARF - Tool Sizes for Power Module Hardware |
Wrench and Socket Head sizes for the VMAR Bird Dog power module hardware are as follows: For the Prop Nuts 7/32" For the Power Module nuts (that fit on the four threaded studs that attach the firewall to fhe fuselage) 7/32" deep socket For the four black machine screws that go through the firewall and thread into tapped holes in the motor mount (backing plate) 2.5mm Allen Wrench For the 2 or 3 black grub screws that retain the motor into the backing plate are accessed via the slot between the motor the backing plate 1.5 mm Allen Wrench.
|
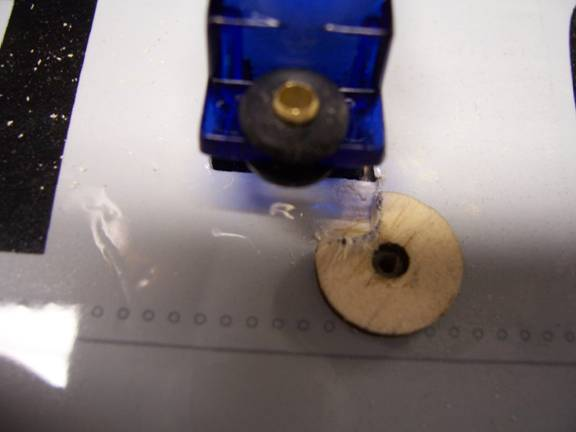
| 1.4. VMA-B210X Bird Dog 06-12 ARF - Wing Servo Requires Clearance Slot in Wing Strut Mounting Washer. |
Question: When I am mounting wing servos in the VMAR Bird Dog, the wing strut attachment point washer is in the way of the mounting tab on one of the servos. What do I do? Solution: This is easy to fix. Use a sharp #11 Xacto blade to knotch out the wooden washer as shown in the picture below. Takes about 15 seconds and you'll be good to go. Note that this notching is only required where the strut washer and servo are in contact. This appears only to be an issue on production models up to November 2005.
|