| 1. VMAR - Documents - Common to Many Models that do not require anything more specific. |
| 1.1. VMA ARF Products - Using POLYCOTE ECS Covering |
PLEASE READ ME FIRST BEFORE PROCEEDING TO ASSEMBLE OR OPERATE THIS PRODUCT This READ ME FIRST is common to many VMA ARF Models having POLYCOTE ECS COVERING that did not require anything more specifically tailored to this particular model at the time of production. A specific READ ME FIRST document may have been subsequently published for this particular model following the production of the model. To check for subsequent publication of a READ ME FIRST document for this model please visit www.richmondrc.com, Enter the Site & click on Support Services. Select Knowledge Base. Review the Table of Contents and search for the name and/or part number of this model. If a READ ME FIRST document exists for this model it takes precedence.
|
| LIABILITY DISCLAIMER & COPYRIGHT NOTICE |
LIABILITY DISCLAIMER The authors and/or suppliers and/or disseminaters of this information and/or product expressly disclaim any warranties or representations, either expressed or implied, including but not limited to implied warranties of fitness, accuracy, timeliness or applicability of the information and/or product provided here. In no event will the authors and/or suppliers and/or disseminaters of this information and/or product have any obligation arising from contract or tort, for loss of revenue or profit, or for indirect, special, incidental, consequential or other damages of any sort arising from this information and/or product. In using this information and/or product, the user accepts all responsibility for and all liability associated with such use. PROCEEDING WITH THE USE OF THIS INFORMATION AND/OR PRODUCT INDICATES AGREEMENT WITH AND ACCEPTANCE OF THE LIABILITY DISCLAIMER.
|
| Please Note the following Caution |
CAUTION A Remote Control (RC) model aircraft is not a toy. It is a flying model that functions much like a full size airplane. If you do not assemble and operate model aircraft properly you can cause injury to yourself and others and damage property. DO NOT FLY a model aircraft unless you are qualified. You are ultimately responsible for the mechanical, aeronautical and electrical integrity of any model you fly and all of the components that make up the model including but not limited to the airframe itself, control surfaces, hinges, linkages, covering, engine, motor, radio, servos, switches, wiring, battery and parts. Check all components before and after each flight. It is essential that you act with the clear understanding that you are solely responsible for all aspects of the model at all times. DO NOT FLY until it is right.
|
| 1.1.1. VMA ARF Products - General Information |
| COPYRIGHT |
Copyright Richmond RC Supply Ltd. All rights reserved.
|
| Tips for Avoiding Common Problems |
We have supplied thousands and thousands and thousands of model aircraft in the past 20 plus years. We're not bragging! We tell you this to give some credibility to our suggested list of tips that follow. In talking to modelers around the world, here is what we have found is the key to... AVOIDING 90% of PROBLEMS that can arise:
|
| 1.1.2. VMA ARF Products - Supplement to the Manual |
|
| Control Horn Installation - How to |
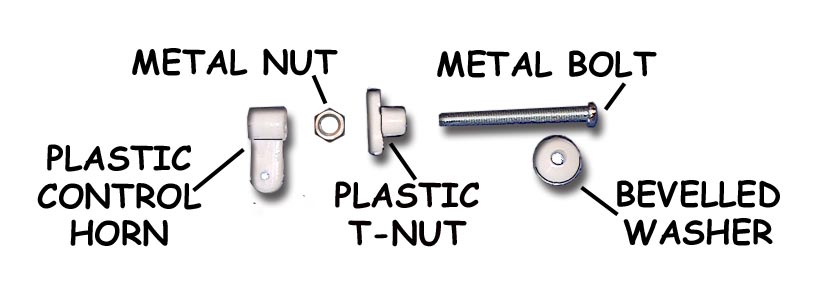
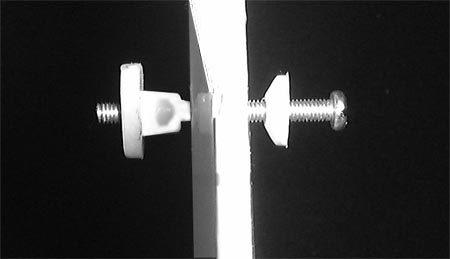
Question: How are VMAR control horns installed? The iillustration below and to the left shows a control horn set before installation. Note 5 parts make up the set. In Light Duty applications the Metal Nut may not be included and only 4 parts will make up the set. The illustration below and to the right shows a control horn set partially installed. Although illustrations in various manuals show the bevelled washer with the bevel pointing away from the surface we find that we get a cleaner strong installation with the bevel pointing inwards. We recommend wicking thin CA such as Pacer ZAP/CA (Pink) into the exposed wood surrounding the hole in the control surface. This helps further strengthen the wood. This is not a requirement but if you are pushing the power limits or planning on extreme aerobatics or speeds, the extra strength could come in handy. Use two applications of thin CA 1 minute apart, BEFORE installing the control horn.
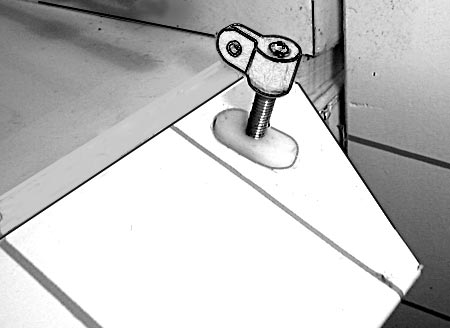
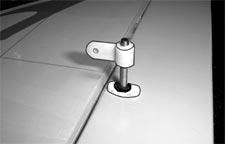
The illustration below shows horn side view of a control horn set fully installed. The illustration to the left is a lighter duty application without the metal nut. The illustration to the right shows a heavier duty application with the metal nut installed. If the metal nuts have been supplied with the horns, we recommend using them.
|
| COPYRIGHT |
Copyright Richmond RC Supply Ltd. All rights reserved.
|
| 1.1.3. VMA ARF Products - Important Information |
|
| 1.1.3.1. VMA ARF Products - Covering POLYCOTE ECS |
This model uses POLYCOTE ECS Covering |
| POLYCOTE ECS - Care & Maintenance - Quick Tips |
|
Question: Do you have any pointers regarding the Care & Maintenance of POLYCOTE ECS? Answer: Yes we have this Summary of Quick Tips. See www.richmondrc.com ( Enter Site > Support Services > Knowledge Base then Search on "Covering") for an expanded explanation of each Tip. Polyester offers the best in covering performance and as with any new modern technology, the maintenance methods may be different than those you used with your older covering. This is NOT Monokote or Solarfilm, its different. If you have used ORACOVER or ULTRACOTE you will have some experience with working with POLYESTER as a covering material. Here is our Summary of Quick Tips related to POLYCOTE ECS covering.
|
| 1.1.4. Support |
On Line, eMail, Fax, Phone, Mail |
| We offer the Best in Support Services. |
We back up our products and our customers with the best support services available. From our industry leading Knowledge Base to information about your Shipment, we've got you covered!
To access our Support Services please:
Your Choice of Support Services that Work for You:
|
| 1.1.4.1. Contact Us |
For Sales and other Inquiries |
| Support - Contact Us - Reach our Sales Department by eMail, Fax, Phone or Mail |
Technical Inquiries: Please review the information provided in our Knowledge Base. After checking our Knowledge Base, if you need further assistance please use our Submit A Question service to get a response within 2 Business Days.
Sales Inquiries: Please note that our Sales Department personnel are trained and dedicated to:
Their depth of technical knowledge is about on par with what is shown in our printed sales literature. In most cases, they are working from the same printed advertisements or content from our web site that you are. Asking sales personnel to confirm the size, color and availability of a product is well within their capabilities. However, asking detailed questions about technical issues is not.
Buy our Products:
For All Other Inquiries... please consult the following resources:
|
| 1.1.5. Keep Up to Date |
Check Frequently for Updates |
| Support - Stay Current - Check Frequently for Updated &/or Additional Information |
This information is subject to change without notice. When viewing this information in a printed form the printing date will be visible in the lower right corner. Check frequently for updates &/or Additional Information.at www.richmondrc.com, > Enter the Site, > Support Services, follow the links to our Knowledge Base. Review the Table of Contents and search for the name and/or part number of this product.
For automated notification of changes to information contained in our Knowledge Base please register as a Priority Response member and subscribe to our Priority Response Notification Service.
|
| 1.2. VMA ARF Products - Using VCOTE Covering |
PLEASE READ ME FIRST BEFORE PROCEEDING TO ASSEMBLE OR OPERATE THIS PRODUCT
This READ ME FIRST is common to many VMA ARF Models having VCOTE COVERING that did not require anything more specifically tailored to this particular model at the time of production. A specific READ ME FIRST document may have been subsequently published for this particular model following the production of the model. To check for subsequent publication of a READ ME FIRST document for this model please visit www.richmondrc.com, Enter the Site & click on Support Services. Select Knowledge Base. Review the Table of Contents and search for the name and/or part number of this model. If a READ ME FIRST document exists for this model it takes precedence.
|
| LIABILITY DISCLAIMER & COPYRIGHT NOTICE |
LIABILITY DISCLAIMER The authors and/or suppliers and/or disseminaters of this information and/or product expressly disclaim any warranties or representations, either expressed or implied, including but not limited to implied warranties of fitness, accuracy, timeliness or applicability of the information and/or product provided here. In no event will the authors and/or suppliers and/or disseminaters of this information and/or product have any obligation arising from contract or tort, for loss of revenue or profit, or for indirect, special, incidental, consequential or other damages of any sort arising from this information and/or product. In using this information and/or product, the user accepts all responsibility for and all liability associated with such use. PROCEEDING WITH THE USE OF THIS INFORMATION AND/OR PRODUCT INDICATES AGREEMENT WITH AND ACCEPTANCE OF THE LIABILITY DISCLAIMER.
|
| Please Note the following Caution |
CAUTION A Remote Control (RC) model aircraft is not a toy. It is a flying model that functions much like a full size airplane. If you do not assemble and operate model aircraft properly you can cause injury to yourself and others and damage property. DO NOT FLY a model aircraft unless you are qualified. You are ultimately responsible for the mechanical, aeronautical and electrical integrity of any model you fly and all of the components that make up the model including but not limited to the airframe itself, control surfaces, hinges, linkages, covering, engine, motor, radio, servos, switches, wiring, battery and parts. Check all components before and after each flight. It is essential that you act with the clear understanding that you are solely responsible for all aspects of the model at all times. DO NOT FLY until it is right.
|
| 1.2.1. VMA ARF Products - General Information |
|
| COPYRIGHT |
Copyright Richmond RC Supply Ltd. All rights reserved.
|
| Tips for Avoiding Common Problems |
We have supplied thousands and thousands and thousands of model aircraft in the past 20 plus years. We're not bragging! We tell you this to give some credibility to our suggested list of tips that follow. In talking to modelers around the world, here is what we have found is the key to... AVOIDING 90% of PROBLEMS that can arise:
|
| 1.2.2. VMA ARF Products - Supplement to the Manual |
| Control Horn Installation - How to |
Question: How are VMAR control horns installed? The iillustration below and to the left shows a control horn set before installation. Note 5 parts make up the set. In Light Duty applications the Metal Nut may not be included and only 4 parts will make up the set. The illustration below and to the right shows a control horn set partially installed. Although illustrations in various manuals show the bevelled washer with the bevel pointing away from the surface we find that we get a cleaner strong installation with the bevel pointing inwards. We recommend wicking thin CA such as Pacer ZAP/CA (Pink) into the exposed wood surrounding the hole in the control surface. This helps further strengthen the wood. This is not a requirement but if you are pushing the power limits or planning on extreme aerobatics or speeds, the extra strength could come in handy. Use two applications of thin CA 1 minute apart, BEFORE installing the control horn.
The illustration below shows horn side view of a control horn set fully installed. The illustration to the left is a lighter duty application without the metal nut. The illustration to the right shows a heavier duty application with the metal nut installed. If the metal nuts have been supplied with the horns, we recommend using them.
|
| 1.2.3. VMA ARF Products - Important Information |
|
| 1.2.3.1. VMA ARF Products - Covering VCOTE |
This model uses VCOTE Covering |
| VCOTE - Care & Maintenance - Quick Tips |
|
Question: Do you have any pointers regarding the Care & Maintenance of VCOTE? Answer: Yes we have this Summary of Quick Tips and at www.richmondrc.com ( Enter Site > Support > Knowledge Base then Search on "Covering") we have an expanded explanation for each of these Tips. VCOTE is a proprietary covering system engineered in Canada & available only from VMAR. Please note that VCOTE is NOT Monokote or Solarfilm, its different. As with any new modern technology, the maintenance methods may be different than those you used with your older covering so its important to read the Tips over FIRST. Whatever you want to do with VCOTE, test it on a small out of the way area first.
Here is our Summary of Quick Tips related to VCOTE covering.
|
| 1.2.4. Support |
On Line, eMail, Fax, Phone, Mail |
| We offer the Best in Support Services. |
We back up our products and our customers with the best support services available. From our industry leading Knowledge Base to information about your Shipment, we've got you covered!
To access our Support Services please:
Your Choice of Support Services that Work for You:
|
| 1.2.4.1. Contact Us |
For Sales and other Inquiries |
| Support - Contact Us - Reach our Sales Department by eMail, Fax, Phone or Mail |
Technical Inquiries: Please review the information provided in our Knowledge Base. After checking our Knowledge Base, if you need further assistance please use our Submit A Question service to get a response within 2 Business Days.
Sales Inquiries: Please note that our Sales Department personnel are trained and dedicated to:
Their depth of technical knowledge is about on par with what is shown in our printed sales literature. In most cases, they are working from the same printed advertisements or content from our web site that you are. Asking sales personnel to confirm the size, color and availability of a product is well within their capabilities. However, asking detailed questions about technical issues is not.
Buy our Products:
For All Other Inquiries... please consult the following resources:
|
| 1.2.5. Keep Up to Date |
Check Frequently for Updates |
| Support - Stay Current - Check Frequently for Updated &/or Additional Information |
This information is subject to change without notice. When viewing this information in a printed form the printing date will be visible in the lower right corner. Check frequently for updates &/or Additional Information.at www.richmondrc.com, > Enter the Site, > Support Services, follow the links to our Knowledge Base. Review the Table of Contents and search for the name and/or part number of this product.
For automated notification of changes to information contained in our Knowledge Base please register as a Priority Response member and subscribe to our Priority Response Notification Service.
|
| 1.3. VMA ARF Products - Using VCOTE2 - 3DS Covering |
PLEASE READ ME FIRST BEFORE PROCEEDING TO ASSEMBLE OR OPERATE THIS PRODUCT
This READ ME FIRST is common to many VMA ARF Models having VCOTE2-3DS COVERING that did not require anything more specifically tailored to this particular model at the time of production. A specific READ ME FIRST document may have been subsequently published for this particular model following the production of the model. To check for subsequent publication of a READ ME FIRST document for this model please visit www.richmondrc.com, Enter the Site & click on Support Services. Select Knowledge Base. Review the Table of Contents and search for the name and/or part number of this model. If a READ ME FIRST document exists for this model it takes precedence.
|
| LIABILITY DISCLAIMER & COPYRIGHT NOTICE |
LIABILITY DISCLAIMER The authors and/or suppliers and/or disseminaters of this information and/or product expressly disclaim any warranties or representations, either expressed or implied, including but not limited to implied warranties of fitness, accuracy, timeliness or applicability of the information and/or product provided here. In no event will the authors and/or suppliers and/or disseminaters of this information and/or product have any obligation arising from contract or tort, for loss of revenue or profit, or for indirect, special, incidental, consequential or other damages of any sort arising from this information and/or product. In using this information and/or product, the user accepts all responsibility for and all liability associated with such use. PROCEEDING WITH THE USE OF THIS INFORMATION AND/OR PRODUCT INDICATES AGREEMENT WITH AND ACCEPTANCE OF THE LIABILITY DISCLAIMER.
|
| Please Note the following Caution |
CAUTION A Remote Control (RC) model aircraft is not a toy. It is a flying model that functions much like a full size airplane. If you do not assemble and operate model aircraft properly you can cause injury to yourself and others and damage property. DO NOT FLY a model aircraft unless you are qualified. You are ultimately responsible for the mechanical, aeronautical and electrical integrity of any model you fly and all of the components that make up the model including but not limited to the airframe itself, control surfaces, hinges, linkages, covering, engine, motor, radio, servos, switches, wiring, battery and parts. Check all components before and after each flight. It is essential that you act with the clear understanding that you are solely responsible for all aspects of the model at all times. DO NOT FLY until it is right.
|
| 1.3.1. VMA ARF Products - General Information |
| COPYRIGHT |
Copyright Richmond RC Supply Ltd. All rights reserved.
|
| Tips for Avoiding Common Problems |
We have supplied thousands and thousands and thousands of model aircraft in the past 20 plus years. We're not bragging! We tell you this to give some credibility to our suggested list of tips that follow. In talking to modelers around the world, here is what we have found is the key to... AVOIDING 90% of PROBLEMS that can arise:
|
| 1.3.2. VMA ARF Products - Supplement to the Manual |
|
| Control Horn Installation - How to |
Question: How are VMAR control horns installed? The iillustration below and to the left shows a control horn set before installation. Note 5 parts make up the set. In Light Duty applications the Metal Nut may not be included and only 4 parts will make up the set. The illustration below and to the right shows a control horn set partially installed. Although illustrations in various manuals show the bevelled washer with the bevel pointing away from the surface we find that we get a cleaner strong installation with the bevel pointing inwards. We recommend wicking thin CA such as Pacer ZAP/CA (Pink) into the exposed wood surrounding the hole in the control surface. This helps further strengthen the wood. This is not a requirement but if you are pushing the power limits or planning on extreme aerobatics or speeds, the extra strength could come in handy. Use two applications of thin CA 1 minute apart, BEFORE installing the control horn.
The illustration below shows horn side view of a control horn set fully installed. The illustration to the left is a lighter duty application without the metal nut. The illustration to the right shows a heavier duty application with the metal nut installed. If the metal nuts have been supplied with the horns, we recommend using them.
|
| 1.3.3. VMA ARF Products - Important Information |
|
| 1.3.3.1. VMA ARF Products - Covering VCOTE2-3DS |
This model uses VCOTE2-3DS Covering |
| VCOTE2-3DS - Care & Maintenance - Quick Tips |
|
Question: Do you have any pointers regarding the Care & Maintenance of VCOTE2 - 3DS? Answer: Yes we have this Summary of Quick Tips and at www.richmondrc.com ( Enter Site > Support > Knowledge Base then Search on "Covering") we have an expanded explanation for each of these Tips. VCOTE2 - 3DS is a proprietary covering system engineered in Canada & available only from VMAR. Please note that VCOTE2 - 3DS is NOT Monokote or Solarfilm, its different. As with any new modern technology, the maintenance methods may be different than those you used with your older covering so its important to read the Tips over FIRST. Whatever you want to do with VCOTE2 - 3DS, test it on a small out of the way area first. Here is our Summary of Quick Tips related to VCOTE2 - 3DS covering.
|
| 1.3.4. Support |
On Line, eMail, Fax, Phone, Mail |
| We offer the Best in Support Services. |
We back up our products and our customers with the best support services available. From our industry leading Knowledge Base to information about your Shipment, we've got you covered!
To access our Support Services please:
Your Choice of Support Services that Work for You:
|
| 1.3.4.1. Contact Us |
For Sales and other Inquiries |
| Support - Contact Us - Reach our Sales Department by eMail, Fax, Phone or Mail |
Technical Inquiries: Please review the information provided in our Knowledge Base. After checking our Knowledge Base, if you need further assistance please use our Submit A Question service to get a response within 2 Business Days.
Sales Inquiries: Please note that our Sales Department personnel are trained and dedicated to:
Their depth of technical knowledge is about on par with what is shown in our printed sales literature. In most cases, they are working from the same printed advertisements or content from our web site that you are. Asking sales personnel to confirm the size, color and availability of a product is well within their capabilities. However, asking detailed questions about technical issues is not.
Buy our Products:
For All Other Inquiries... please consult the following resources:
|
| 1.3.5. Keep Up to Date |
Check Frequently for Updates |
| Support - Stay Current - Check Frequently for Updated &/or Additional Information |
This information is subject to change without notice. When viewing this information in a printed form the printing date will be visible in the lower right corner. Check frequently for updates &/or Additional Information.at www.richmondrc.com, > Enter the Site, > Support Services, follow the links to our Knowledge Base. Review the Table of Contents and search for the name and/or part number of this product.
For automated notification of changes to information contained in our Knowledge Base please register as a Priority Response member and subscribe to our Priority Response Notification Service.
|