ArticlesArticles Most Popular ArticlesMost Popular Articles Most Helpful ArticlesMost Helpful Articles Submit A QuestionSubmit A Question Login for PRIORITY RESPONSELogin for PRIORITY RESPONSE
RSS Feeds
DrillDown Icon Table of Contents Back
 . . . . . . . . . . . . .
DrillDown Icon LIABILITY & COPYRIGHT
DrillDown Icon Site Information
DrillDown Icon * Support
DrillDown Icon Technical Info - Adhesives
DrillDown Icon Technical Info - Master Airscrew
DrillDown Icon Technical Info - POLYPRO
DrillDown Icon Technical Info - RC Flying - General
DrillDown Icon Technical Info - RC Flying Electric - General
DrillDown Icon Technical Info - ULTRA POWER Technology - Products
DrillDown Icon Technical Info - VMAR - General
DrillDown Icon Technical Info - VMAR - Products
DrillDown Icon VMA-A0026 Avenger 60 ARF
DrillDown Icon VMA-A460X A4 Skyhawk Jet (Prop) 45-52 ARF
DrillDown Icon VMA-A140X Apache III
DrillDown Icon VMA-A340X Arrow Tiger
DrillDown Icon VMA-BS110 Balsa Stripper
DrillDown Icon VMA-B140X Beaver 45-60 ARF
DrillDown Icon VMA-B160C Beaver 60-90 ARF
DrillDown Icon VMA-B191C Beaver 120 ARF
DrillDown Icon VMA-B210X Bird Dog 06-12 ARF
DrillDown Icon VMA-C019 Cap 231EX 90-120 ARF
DrillDown Icon VMA-C0024X Chipmunk 40 ARF
DrillDown Icon VMA-C044 Cap 231EX 40 ARF
DrillDown Icon VMA-C210X J3 & L4 09-15 ARF
DrillDown Icon VMA-C260U F4U Corsair 60 ARF
DrillDown Icon VMA-C360X Cessna 182 45-60 ARF
DrillDown Icon VMA-D014 Discovery 40 ARF
DrillDown Icon VMA-D160F Dewoitine D520 45-60 ARF
DrillDown Icon VMA-D210X DO27 1100 EP Electric ARF
DrillDown Icon VMA-D260X Dornier DO27 45-61 ARF ECS
DrillDown Icon VMA-D290Z Dornier DO27 120+ ARF
DrillDown Icon VMA-D310X DO335 1240/300 Twin EP ARF ECS Electric
DrillDown Icon VMA-E0014 Extra 300L
DrillDown Icon VMA-ETS120 Engine Test Stand
DrillDown Icon VMA-E160X Edge 540T
DrillDown Icon VMA-E24XX Easy 3D ARF ECS
DrillDown Icon * Additional Information
DrillDown Icon Assembly & Operations Manual
DrillDown Icon Specifications
DrillDown Icon Using Glow Power
DrillDown Icon + READ ME FIRST
DrillDown Icon General Information
DrillDown Icon * Important Information
DrillDown Icon Preparation & Templates
DrillDown Icon Power Module Firewall
DrillDown Icon Align the Engine Mount
DrillDown Icon Install the Engine Mount
DrillDown Icon Install the Fuel Tank
DrillDown Icon Modify the Fixed Firewall
DrillDown Icon Temporarily Attach Power Module
DrillDown Icon Install Engine, Cowl etc
DrillDown Icon Finalize Attachment of Power Module
DrillDown Icon * Support
DrillDown Icon Stay Current - Check Frequently
DrillDown Icon VMA-E260X Extra 330L
DrillDown Icon VMA-E340X Escape 40-52 ARF
DrillDown Icon VMA-F210X Fournier RF4D 2000 ARF ECS Electric
DrillDown Icon VMA-F35X08 Floats
DrillDown Icon VMA-F40X12 Floats
DrillDown Icon VMA-F490X Phantom II 60-90 Jet (Prop) ARF
DrillDown Icon VMA-F590X F5E Tiger II 60-91 Jet (Prop) ARF
DrillDown Icon VMA-F690X F18 Hornet 60-91 JET (PROP) ARF
DrillDown Icon VMA-H240X Hornet 40-52 ARF
DrillDown Icon VMA-J210X JU52 Trimotor 64in ARF ECS
DrillDown Icon VMA-M024 T34C Mentor 40 ARF
DrillDown Icon VMA-M340U P51D Mustang 40 ARF
DrillDown Icon VMA-M490R Mig 21 60-91 Jet (Prop) ARF
DrillDown Icon VMA-M195U P51D Mustang 90-120+ ARF
DrillDown Icon VMA-N210X Nouvo 1300 EP 51 in. Electric ARF
DrillDown Icon VMA-OLEOxxx Oleo Strut Sets
DrillDown Icon VMA-P190X 90+ Texan II, Harvard II & PC9
DrillDown Icon VMA-P210X PC9 & Texan II 06-12 ARF
DrillDown Icon VMA-P240X Texan II, Harvard II & PC9 45-60 ARF
DrillDown Icon VMA-R014 Ramrod
DrillDown Icon VMA-R160F JODEL DR400 45-61 ARF
DrillDown Icon VMA-R240X RV4 45-60 ARF
DrillDown Icon VMA-S140X Aero Subaru 40-52 ARF
DrillDown Icon VMA-S190X SU27 Flanker 60-91 Jet (Prop) ARF 3DS
DrillDown Icon VMA-S195B Spitfire 90-120+ ARF
DrillDown Icon VMA-S210X Aero Subaru 06-15 ARF
DrillDown Icon VMA-S220X FI156 Storch 76 in. ARF ECS Electric
DrillDown Icon VMA-S240X Stinger 40-52ARF
DrillDown Icon VMA-T210X Twin Otter 09-15 ARF ECS Electric
DrillDown Icon VMA-U160X V-Stik 60 ARF
DrillDown Icon VMA-X140X Xtreme Stik 40-52 ARF
DrillDown Icon VMA-X240X Xtreme Stik 40-52 ARF
DrillDown Icon Technical Info - VMAX Electric Power Systems - General
DrillDown Icon Technical Info - VMAX Electric Power Systems - Products
DrillDown Icon Technical Info - VMAX Engines (Glow) - General
DrillDown Icon Technical Info - VMAX Engines (Glow) - Products
  Email This ArticlePrint PreviewPrint Current Article/Category and All Sub-Articles/Categories
 
VMA-E240X Easy 3D 45-52 ARF - Align the Engine Mount (T-beams)
After completing the cutting and drilling of your power module firewall, review Pictures 14D and 15A in the Easy 3D Assembly and Operations Manual. 
 
Use Template B.  This template is used to position the T-beam engine mounts and subsequently drill the T-beam mounting holes in the power module firewall. This template is for the VMAX 46PRO, 52PRO and similar engines that mount on T-beams with approximately 1.53 in spacing (38mm) between the lug portion of the beams. If your engine mounting lugs require T-beam spacing that cannot work with 38mm spacing you can modify the template by cutting the template vertically along the center line and increasing or decreasing the distance between the resultant template halves to reflect the size of your engine.
 
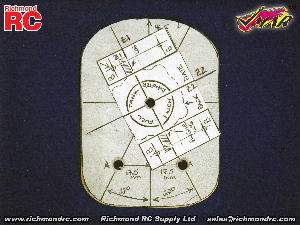
The Template B sheet contains a expanded depiction of a typical T-beam mount and engine installation. Use scissors to cut out just the retangle bounded by the T-beam mounts as shown in Template B. Consult the pictures before cutting. You want to end up with Template B looking like the lighter (whiter) shaded paper shown in the pictures below.
 
Position the center point of Template B over the center line intersection point of Template A on the power module firewall. Rotate Template B 207 degrees counter clockwise from horizontal until the engine lug lines on Template B align with the corresponding diagonal lines (Z1 to Z1 and Z2 to Z2) shown on Template A attached earlier to the firewall. Ensure the center point of Template B remains centered over the fuel tank outlet hole while the lug line remains aligned diagonally. Secure Template B in this position using adhesive from a glue stick.    
 
Use a scroll saw to cut the fuel tank outlet clearance hole in the plywood as shown on the template. 
 
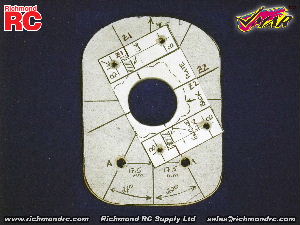
Center punch the four holes marked B. Drill all three center punch locations with a 5/32 inch drill. You can use a 3/16" drill if you wish to provide a bit looser tolerance. After drilling the holes, turn the firewall over and counter sink these four holes from the back of the wirewall using a 27/64 in. drill. Counter sink the holes to a depth of the thickness of a washer (approx 1-1.5mm) at the perimeter of the counter sunk holes.  
 
If you wish to seal the power module firewall, now is the time to do it. This is not mandatory but makes for a neater more professional looking finish. Remove the templates and wipe away any adhesive residue. Blow off any dust. Coat all surfaces with Pacer Finishing Resin. Set aside to cure.
 

Template B overlying and aligned with diagonal lines of Template A.

 
T-beam mounting holes drilled
 
Back view after T-beam mounting holes have been countersunk
 
Article ID: 7416