| 1. Power Packs (Electric) - Brushless Motor, ESC, Firewall, LiPo Battery, Prop & Connectors |
VMAR Power Packs for VMAR Electric ARF models contain all of the items related to the electric power (propulsion) system including wiring harnesses and servo extension wires.
20200428... please note that we are no longer supplying Power Packs. If you wish to purchase a Motor and ESC for your VMAR model, check out our Power Modules. |
| 1.1. Power Packs - For VMAR Electric Models - Overview |
VMAX Power Packs are intended for modelers who want to purchase a factory designed power system specifically engineered for their VMAR Electric ARF. VMAX Power Packs come complete with Power Module Firewalls, Brushless Motors, Electronic Speed Controls, Li Po Batteries, Propellers and Wiring Harness Sets necessary to get your model in the air with the least amount of mucking around and the maximum amount of performance value.
VMAX Power Packs are perfect for the entire gamut of the modeler spectrum ranging from novices who would rather fly than integrate third party electronics to prosumer RC experts who are short on time and long on experience. For your next VMAR Electric ARF, ask for a VMAX Power Pack to help get you in the air and keep you there!
|
| 1.2. Power Packs - For VMAR Electric Models - Typical Contents |
VMAX Power Packs are factory designed for each VMAR Electric Model and contain the Power Module (with firewalls, electric motors and electronic speed controls (ESC)), wiring with connectors or wiring harness set, battery pack and propellor(s). (Note: Power Packs for multi-motor models include the Power Module for that model including multiple firewalls, motors and speed controls as required to power the model)
VMAX Power Packs do NOT include:
These components are NOT included in the Power Pack and will be needed to complete and operate your model. If you do not already have these items, they are available separately.
|
| 1.3. Power Pack - For VMA-S210X Aero Subaru |
The Power Pack for the Aero Subaru consists of a Brushless Motor, Electronic Speed Control (ESC), pre-drilled Firewall, LiPo Battery Pack, Prop & Connectors. |
| 1.4. Power Pack - For VMA-B210X Bird Dog |
The Power Pack for the Bird Dog consists of a Brushless Motor, Electronic Speed Control (ESC), pre-drilled Firewall, LiPo Battery Pack, Prop & Connectors. |
| 1.5. Power Pack - For VMA-C210X J3 Cub & L4 Grasshopper |
The Power Pack for the J3 Cub and L4 Grasshopper consists of a Brushless Motor, Electronic Speed Control (ESC), pre-drilled Firewall, LiPo Battery Pack, Prop & Connectors. |
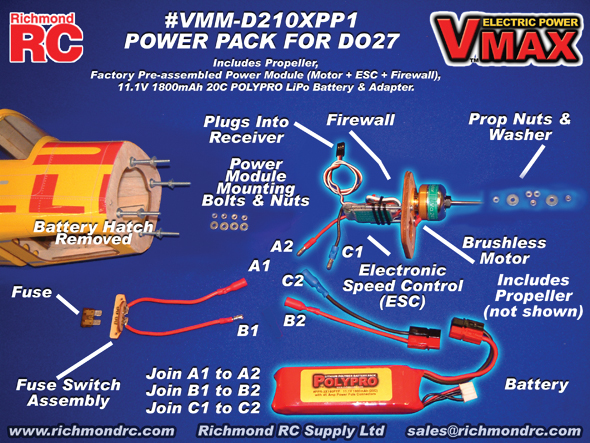
| 1.6. Power Pack - For VMA-D210X DO27 |
| 1.6.1. Power Pack - #VMM-D210XPP1 For VMA-D210X DO27 - READ ME FIRST |
PLEASE READ ME FIRST BEFORE PROCEEDING TO ASSEMBLE OR OPERATE THIS PRODUCT |
| LIABILITY DISCLAIMER & COPYRIGHT NOTICE |
LIABILITY DISCLAIMER The authors and/or suppliers and/or disseminaters of this information and/or product expressly disclaim any warranties or representations, either expressed or implied, including but not limited to implied warranties of fitness, accuracy, timeliness or applicability of the information and/or product provided here. In no event will the authors and/or suppliers and/or disseminaters of this information and/or product have any obligation arising from contract or tort, for loss of revenue or profit, or for indirect, special, incidental, consequential or other damages of any sort arising from this information and/or product. In using this information and/or product, the user accepts all responsibility for and all liability associated with such use. PROCEEDING WITH THE USE OF THIS INFORMATION AND/OR PRODUCT INDICATES AGREEMENT WITH AND ACCEPTANCE OF THE LIABILITY DISCLAIMER.
|
| Please Note the following Caution |
CAUTION A Remote Control (RC) model aircraft is not a toy. It is a flying model that functions much like a full size airplane. If you do not assemble and operate model aircraft properly you can cause injury to yourself and others and damage property. DO NOT FLY a model aircraft unless you are qualified. You are ultimately responsible for the mechanical, aeronautical and electrical integrity of any model you fly and all of the components that make up the model including but not limited to the airframe itself, control surfaces, hinges, linkages, covering, engine, motor, radio, servos, switches, wiring, battery and parts. Check all components before and after each flight. It is essential that you act with the clear understanding that you are solely responsible for all aspects of the model at all times. DO NOT FLY until it is right.
|
| 1.6.1.1. Think Safety |
| When working with Batteries, Electric Models, Motors & Propellers, Chargers & Electrical Devices | |
|
| 1.6.1.2. Power Pack - For VMA-D210X DO27 - General Information |
| COPYRIGHT |
Copyright Richmond RC Supply Ltd. All rights reserved.
|
| Tips for Avoiding Common Problems |
We have supplied thousands and thousands and thousands of model aircraft in the past 20 plus years. We're not bragging! We tell you this to give some credibility to our suggested list of tips that follow. In talking to modelers around the world, here is what we have found is the key to... AVOIDING 90% of PROBLEMS that can arise:
|
| 1.6.1.3. Power Pack - For VMA-D210X DO27 - Introduction |
Before beginning the Installation Instructions please read the Overview and check off the components provided. Each component is in a labelled parts bag. Please check off the components against the Contents list below. Leave the components in their parts bags for now. Do not remove the components from their parts bags until each is needed during the installation process.
|
| Power Packs - For VMAR Electric Models - Overview |
VMAX Power Packs are intended for modelers who want to purchase a factory designed power system specifically engineered for their VMAR Electric ARF. VMAX Power Packs come complete with Power Module Firewalls, Brushless Motors, Electronic Speed Controls, Li Po Batteries, Propellers and Wiring Harness Sets necessary to get your model in the air with the least amount of mucking around and the maximum amount of performance value.
VMAX Power Packs are perfect for the entire gamut of the modeler spectrum ranging from novices who would rather fly than integrate third party electronics to prosumer RC experts who are short on time and long on experience. For your next VMAR Electric ARF, ask for a VMAX Power Pack to help get you in the air and keep you there!
|
| 1.6.1.4. Power Pack - For VMA-D210X DO27 - Contents |
This VMAX Power Pack (#VMM-D210XPP1) contains the following:
|
| Power Module Set - For VMA-D210X DO27 - Contents |
This Power Module Set (#VMM-D210PM1) includes the components listed below.
|
| 1.6.1.5. Power Pack - For VMA-D210X DO27 - Installation Instructions |
Consult any labels carefully, particularly the larger WARNING labels. The labels are largely self explanatory. Reading the labels will save you a great deal of time and help prevent damage to your equipment.
|
| 1.6.1.5.1. Stage 1 - Install Power Module - For VMA-D210X DO27 |
|
| 1.6.1.5.2. Stage 2 - Install Wiring - For VMA-D210X DO27 |
|
| 1.6.1.5.3. Stage 3 - Install Propeller & Battery - For VMA-D210X DO27 |
|
| 1.6.1.6. Power Pack - For VMA-D210X DO27 - Operating |
Consult any labels carefully, particularly the larger WARNING labels. The labels are largely self explanatory. Paying attention to the operating limits will help prevent damage to your equipment.
We developed this Power Pack as a "system" suitable for your model. We strongly advise against changing any component within this system. If a component requires replacement, ensure you replace it with a new but identical component to that which is being swapped out.
|
| 1.6.1.6.1. Motors - Power Pack Operations - VMA-D210X DO27 |
|
| 1.6.1.6.2. Battery - Power Pack Operations - For VMA-D210X DO27 |
|
| 1.6.1.7. Power Pack - For VMA-D210X DO27 - No No's & Must Do's |
|
| 1.6.1.8. Support |
On Line, eMail, Fax, Phone, Mail |
| We offer the Best in Support Services. |
We back up our products and our customers with the best support services available. From our industry leading Knowledge Base to information about your Shipment, we've got you covered!
To access our Support Services please:
Your Choice of Support Services that Work for You:
|
| 1.6.1.8.1. Contact Us |
For Sales and other Inquiries |
| Support - Contact Us - Reach our Sales Department by eMail, Fax, Phone or Mail |
Technical Inquiries: Please review the information provided in our Knowledge Base. After checking our Knowledge Base, if you need further assistance please use our Submit A Question service to get a response within 2 Business Days.
Sales Inquiries: Please note that our Sales Department personnel are trained and dedicated to:
Their depth of technical knowledge is about on par with what is shown in our printed sales literature. In most cases, they are working from the same printed advertisements or content from our web site that you are. Asking sales personnel to confirm the size, color and availability of a product is well within their capabilities. However, asking detailed questions about technical issues is not.
Buy our Products:
For All Other Inquiries... please consult the following resources:
|
| 1.6.1.9. Keep Up to Date |
Check Frequently for Updates |
| Support - Stay Current - Check Frequently for Updated &/or Additional Information |
This information is subject to change without notice. When viewing this information in a printed form the printing date will be visible in the lower right corner. Check frequently for updates &/or Additional Information.at www.richmondrc.com, > Enter the Site, > Support Services, follow the links to our Knowledge Base. Review the Table of Contents and search for the name and/or part number of this product.
For automated notification of changes to information contained in our Knowledge Base please register as a Priority Response member and subscribe to our Priority Response Notification Service.
|
| 1.6.2. Power Pack - #VMM-D210XPP1 For VMA-D210X DO27 - Additional Information |
In general "Additional" Information is:
Subject to the Conditions of Use, please review the attachments and related articles listed below. |
| COPYRIGHT |
Copyright Richmond RC Supply Ltd. All rights reserved.
|
| 1.7. Power Pack - For VMA-J210X JU52 Trimotor |
| 1.7.1. Power Pack - #VMM-J210XPP1 For VMA-J210X JU52 Trimotor - READ ME FIRST |
PLEASE READ ME FIRST BEFORE PROCEEDING TO ASSEMBLE OR OPERATE THIS PRODUCT |
| LIABILITY DISCLAIMER & COPYRIGHT NOTICE |
LIABILITY DISCLAIMER The authors and/or suppliers and/or disseminaters of this information and/or product expressly disclaim any warranties or representations, either expressed or implied, including but not limited to implied warranties of fitness, accuracy, timeliness or applicability of the information and/or product provided here. In no event will the authors and/or suppliers and/or disseminaters of this information and/or product have any obligation arising from contract or tort, for loss of revenue or profit, or for indirect, special, incidental, consequential or other damages of any sort arising from this information and/or product. In using this information and/or product, the user accepts all responsibility for and all liability associated with such use. PROCEEDING WITH THE USE OF THIS INFORMATION AND/OR PRODUCT INDICATES AGREEMENT WITH AND ACCEPTANCE OF THE LIABILITY DISCLAIMER.
|
| Please Note the following Caution |
CAUTION A Remote Control (RC) model aircraft is not a toy. It is a flying model that functions much like a full size airplane. If you do not assemble and operate model aircraft properly you can cause injury to yourself and others and damage property. DO NOT FLY a model aircraft unless you are qualified. You are ultimately responsible for the mechanical, aeronautical and electrical integrity of any model you fly and all of the components that make up the model including but not limited to the airframe itself, control surfaces, hinges, linkages, covering, engine, motor, radio, servos, switches, wiring, battery and parts. Check all components before and after each flight. It is essential that you act with the clear understanding that you are solely responsible for all aspects of the model at all times. DO NOT FLY until it is right.
|
| 1.7.1.1. Think Safety |
| When working with Batteries, Electric Models, Motors & Propellers, Chargers & Electrical Devices | |
|
| 1.7.1.2. Power Pack - For VMA-J210X JU52 Trimotor - General Information |
| COPYRIGHT |
Copyright Richmond RC Supply Ltd. All rights reserved.
|
| Tips for Avoiding Common Problems |
We have supplied thousands and thousands and thousands of model aircraft in the past 20 plus years. We're not bragging! We tell you this to give some credibility to our suggested list of tips that follow. In talking to modelers around the world, here is what we have found is the key to... AVOIDING 90% of PROBLEMS that can arise:
|
| 1.7.1.3. Power Pack - For VMA-J210X JU52 Trimotor - Introduction |
Before beginning the Installation Instructions please read the Overview and check off the components provided. Each component is in a labelled parts bag. Please check off the components against the Contents list below. Leave the components in their parts bags for now. Do not remove the components from their parts bags until each is needed during the installation process.
|
| Power Packs - For VMAR Electric Models - Overview |
VMAX Power Packs are intended for modelers who want to purchase a factory designed power system specifically engineered for their VMAR Electric ARF. VMAX Power Packs come complete with Power Module Firewalls, Brushless Motors, Electronic Speed Controls, Li Po Batteries, Propellers and Wiring Harness Sets necessary to get your model in the air with the least amount of mucking around and the maximum amount of performance value.
VMAX Power Packs are perfect for the entire gamut of the modeler spectrum ranging from novices who would rather fly than integrate third party electronics to prosumer RC experts who are short on time and long on experience. For your next VMAR Electric ARF, ask for a VMAX Power Pack to help get you in the air and keep you there!
|
| 1.7.1.4. Power Pack - For VMA-J210X JU52 Trimotor - Contents |
This VMAX Power Pack (#VMM-J210XPP1) contains the following:
|
| Wiring Harness Set - For VMA-J210X JU52 Trimotor - Contents |
This VMAR Wiring Harness Set (WHS) contains the following
This VMAR Wiring Harness Set also contains:
|
| Power Module - For VMA-J210X JU52 Trimotor - Contents |
This VMAX Power Module (#VMM-J210PM1) contains the following
|
| 1.7.1.5. Power Pack - For VMA-J210X JU52 Trimotor - Installation Instructions |
Consult any labels carefully, particularly the larger WARNING labels. The labels are largely self explanatory. Reading the labels will save you a great deal of time and help prevent damage to your equipment.
|
| 1.7.1.5.1. Stage 1 - Install Power Module - For VMA-J210X JU52 Trimotor |
|
| 1.7.1.5.2. Stage 2 - Install Wiring Harness Set - For VMA-J210X JU52 Trimotor |
|
| 1.7.1.5.3. Stage 3 - Install Props, Battery etc - For VMA-J210X JU52 Trimotor |
|
| 1.7.1.6. Power Pack - For VMA-J210X JU52 Trimotor - Operating |
Consult any labels carefully, particularly the larger WARNING labels. The labels are largely self explanatory. Paying attention to the operating limits will help prevent damage to your equipment.
We developed this Power Pack as a "system" suitable for your model. We strongly advise against changing any component within this system. If a component requires replacement, ensure you replace it with a new but identical component to that which is being swapped out.
|
| 1.7.1.6.1. Motors - Power Pack Operations - VMA-J210X JU52 Trimotor |
|
| 1.7.1.6.2. Battery - Power Pack Operations - For VMA-J210X JU52 Trimotor |
|
| 1.7.1.7. Power Pack - For VMA-J210X JU52 Trimotor - No No's & Must Do's |
|
| 1.7.1.8. Support |
On Line, eMail, Fax, Phone, Mail |
| We offer the Best in Support Services. |
We back up our products and our customers with the best support services available. From our industry leading Knowledge Base to information about your Shipment, we've got you covered!
To access our Support Services please:
Your Choice of Support Services that Work for You:
|
| 1.7.1.8.1. Contact Us |
For Sales and other Inquiries |
| Support - Contact Us - Reach our Sales Department by eMail, Fax, Phone or Mail |
Technical Inquiries: Please review the information provided in our Knowledge Base. After checking our Knowledge Base, if you need further assistance please use our Submit A Question service to get a response within 2 Business Days.
Sales Inquiries: Please note that our Sales Department personnel are trained and dedicated to:
Their depth of technical knowledge is about on par with what is shown in our printed sales literature. In most cases, they are working from the same printed advertisements or content from our web site that you are. Asking sales personnel to confirm the size, color and availability of a product is well within their capabilities. However, asking detailed questions about technical issues is not.
Buy our Products:
For All Other Inquiries... please consult the following resources:
|
| 1.7.1.9. Keep Up to Date |
Check Frequently for Updates |
| Support - Stay Current - Check Frequently for Updated &/or Additional Information |
This information is subject to change without notice. When viewing this information in a printed form the printing date will be visible in the lower right corner. Check frequently for updates &/or Additional Information.at www.richmondrc.com, > Enter the Site, > Support Services, follow the links to our Knowledge Base. Review the Table of Contents and search for the name and/or part number of this product.
For automated notification of changes to information contained in our Knowledge Base please register as a Priority Response member and subscribe to our Priority Response Notification Service.
|
| 1.7.2. Power Pack - #VMM-J210XPP1 For VMA-J210X JU52 Trimotor - Additional Information |
In general "Additional" Information is:
Subject to the Conditions of Use, please review the attachments and related articles listed below. |
| COPYRIGHT |
Copyright Richmond RC Supply Ltd. All rights reserved.
|
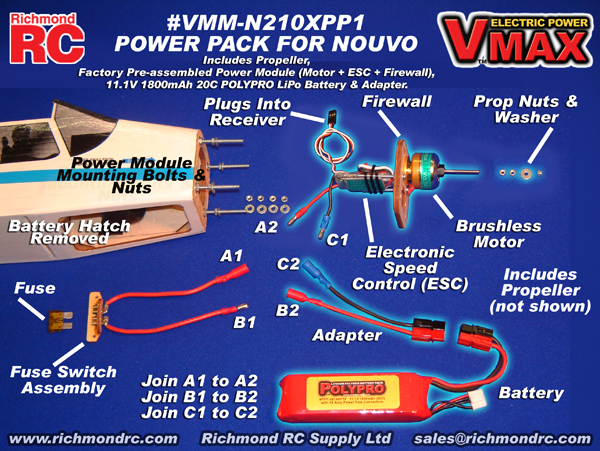
| 1.8. Power Pack - For VMA-N210X Nouvo |
| 1.8.1. Power Pack - #VMM-N210XPP1 For VMA-N210X Nouvo - READ ME FIRST |
PLEASE READ ME FIRST BEFORE PROCEEDING TO ASSEMBLE OR OPERATE THIS PRODUCT |
| LIABILITY DISCLAIMER & COPYRIGHT NOTICE |
LIABILITY DISCLAIMER The authors and/or suppliers and/or disseminaters of this information and/or product expressly disclaim any warranties or representations, either expressed or implied, including but not limited to implied warranties of fitness, accuracy, timeliness or applicability of the information and/or product provided here. In no event will the authors and/or suppliers and/or disseminaters of this information and/or product have any obligation arising from contract or tort, for loss of revenue or profit, or for indirect, special, incidental, consequential or other damages of any sort arising from this information and/or product. In using this information and/or product, the user accepts all responsibility for and all liability associated with such use. PROCEEDING WITH THE USE OF THIS INFORMATION AND/OR PRODUCT INDICATES AGREEMENT WITH AND ACCEPTANCE OF THE LIABILITY DISCLAIMER.
|
| Please Note the following Caution |
CAUTION A Remote Control (RC) model aircraft is not a toy. It is a flying model that functions much like a full size airplane. If you do not assemble and operate model aircraft properly you can cause injury to yourself and others and damage property. DO NOT FLY a model aircraft unless you are qualified. You are ultimately responsible for the mechanical, aeronautical and electrical integrity of any model you fly and all of the components that make up the model including but not limited to the airframe itself, control surfaces, hinges, linkages, covering, engine, motor, radio, servos, switches, wiring, battery and parts. Check all components before and after each flight. It is essential that you act with the clear understanding that you are solely responsible for all aspects of the model at all times. DO NOT FLY until it is right.
|
| 1.8.1.1. Think Safety |
| When working with Batteries, Electric Models, Motors & Propellers, Chargers & Electrical Devices | |
|
| 1.8.1.2. Power Pack - For VMA-N210X Nouvo - General Information |
| COPYRIGHT |
Copyright Richmond RC Supply Ltd. All rights reserved.
|
| Tips for Avoiding Common Problems |
We have supplied thousands and thousands and thousands of model aircraft in the past 20 plus years. We're not bragging! We tell you this to give some credibility to our suggested list of tips that follow. In talking to modelers around the world, here is what we have found is the key to... AVOIDING 90% of PROBLEMS that can arise:
|
| 1.8.1.3. Power Pack - For VMA-N210X Nouvo - Introduction |
Before beginning the Installation Instructions please read the Overview and check off the components provided. Each component is in a labelled parts bag. Please check off the components against the Contents list below. Leave the components in their parts bags for now. Do not remove the components from their parts bags until each is needed during the installation process.
|
| Power Packs - For VMAR Electric Models - Overview |
VMAX Power Packs are intended for modelers who want to purchase a factory designed power system specifically engineered for their VMAR Electric ARF. VMAX Power Packs come complete with Power Module Firewalls, Brushless Motors, Electronic Speed Controls, Li Po Batteries, Propellers and Wiring Harness Sets necessary to get your model in the air with the least amount of mucking around and the maximum amount of performance value.
VMAX Power Packs are perfect for the entire gamut of the modeler spectrum ranging from novices who would rather fly than integrate third party electronics to prosumer RC experts who are short on time and long on experience. For your next VMAR Electric ARF, ask for a VMAX Power Pack to help get you in the air and keep you there!
|
| 1.8.1.4. Power Pack - For VMA-N210X Nouvo - Contents |
This VMAX Power Pack (#VMM-N210XPP1) contains the following:
|
| Power Module Set - For VMA-N210X Nouvo - Contents |
This Power Module Set (#VMM-N210XPM1) consists of the following components:
|
| 1.8.1.5. Power Pack - For VMA-N210X Nouvo - Installation Instructions |
Consult any labels carefully, particularly the larger WARNING labels. The labels are largely self explanatory. Reading the labels will save you a great deal of time and help prevent damage to your equipment.
|
| 1.8.1.5.1. Stage 1 - Install Power Module - For VMA-N210X Nouvo |
|
| 1.8.1.5.2. Stage 2 - Install Wiring - For VMA-N210X Nouvo |
|
| 1.8.1.5.3. Stage 3 - Install Propeller & Battery - For VMA-N210X Nouvo |
|
| 1.8.1.6. Power Pack - For VMA-N210X Nouvo - Operating |
Consult any labels carefully, particularly the larger WARNING labels. The labels are largely self explanatory. Paying attention to the operating limits will help prevent damage to your equipment.
We developed this Power Pack as a "system" suitable for your model. We strongly advise against changing any component within this system. If a component requires replacement, ensure you replace it with a new but identical component to that which is being swapped out.
|
| 1.8.1.6.1. Motors - Power Pack Operations - VMA-N210X Nouvo |
|
| 1.8.1.6.2. Battery - Power Pack Operations - For VMA-N210X Nouvo |
|
| 1.8.1.7. Power Pack - For VMA-N210X Nouvo - No No's & Must Do's |
|
| 1.8.1.8. Support |
On Line, eMail, Fax, Phone, Mail |
| We offer the Best in Support Services. |
We back up our products and our customers with the best support services available. From our industry leading Knowledge Base to information about your Shipment, we've got you covered!
To access our Support Services please:
Your Choice of Support Services that Work for You:
|
| 1.8.1.8.1. Contact Us |
For Sales and other Inquiries |
| Support - Contact Us - Reach our Sales Department by eMail, Fax, Phone or Mail |
Technical Inquiries: Please review the information provided in our Knowledge Base. After checking our Knowledge Base, if you need further assistance please use our Submit A Question service to get a response within 2 Business Days.
Sales Inquiries: Please note that our Sales Department personnel are trained and dedicated to:
Their depth of technical knowledge is about on par with what is shown in our printed sales literature. In most cases, they are working from the same printed advertisements or content from our web site that you are. Asking sales personnel to confirm the size, color and availability of a product is well within their capabilities. However, asking detailed questions about technical issues is not.
Buy our Products:
For All Other Inquiries... please consult the following resources:
|
| 1.8.1.9. Keep Up to Date |
Check Frequently for Updates |
| Support - Stay Current - Check Frequently for Updated &/or Additional Information |
This information is subject to change without notice. When viewing this information in a printed form the printing date will be visible in the lower right corner. Check frequently for updates &/or Additional Information.at www.richmondrc.com, > Enter the Site, > Support Services, follow the links to our Knowledge Base. Review the Table of Contents and search for the name and/or part number of this product.
For automated notification of changes to information contained in our Knowledge Base please register as a Priority Response member and subscribe to our Priority Response Notification Service.
|
| 1.8.2. Power Pack - #VMM-N210XPP1 For VMA-N210X Nouvo - Additional Information |
In general "Additional" Information is:
Subject to the Conditions of Use, please review the attachments and related articles listed below. |
| COPYRIGHT |
Copyright Richmond RC Supply Ltd. All rights reserved.
|
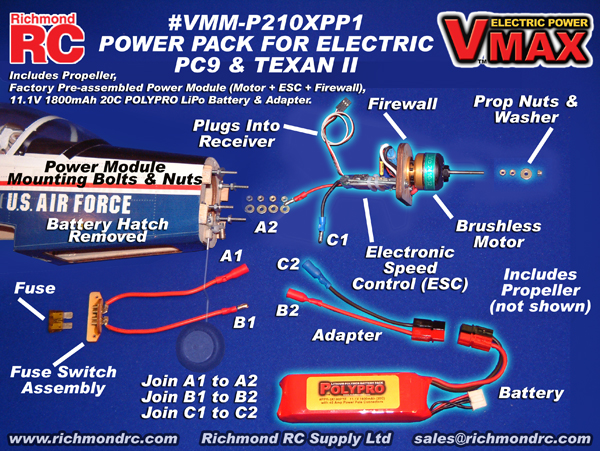
| 1.9. Power Pack - For VMA-P210X PC9 & Texan II |
| 1.9.1. Power Pack - #VMM-P210XPP1 For VMA-P210X PC9 & Texan II - READ ME FIRST |
PLEASE READ ME FIRST BEFORE PROCEEDING TO ASSEMBLE OR OPERATE THIS PRODUCT |
| LIABILITY DISCLAIMER & COPYRIGHT NOTICE |
LIABILITY DISCLAIMER The authors and/or suppliers and/or disseminaters of this information and/or product expressly disclaim any warranties or representations, either expressed or implied, including but not limited to implied warranties of fitness, accuracy, timeliness or applicability of the information and/or product provided here. In no event will the authors and/or suppliers and/or disseminaters of this information and/or product have any obligation arising from contract or tort, for loss of revenue or profit, or for indirect, special, incidental, consequential or other damages of any sort arising from this information and/or product. In using this information and/or product, the user accepts all responsibility for and all liability associated with such use. PROCEEDING WITH THE USE OF THIS INFORMATION AND/OR PRODUCT INDICATES AGREEMENT WITH AND ACCEPTANCE OF THE LIABILITY DISCLAIMER.
|
| Please Note the following Caution |
CAUTION A Remote Control (RC) model aircraft is not a toy. It is a flying model that functions much like a full size airplane. If you do not assemble and operate model aircraft properly you can cause injury to yourself and others and damage property. DO NOT FLY a model aircraft unless you are qualified. You are ultimately responsible for the mechanical, aeronautical and electrical integrity of any model you fly and all of the components that make up the model including but not limited to the airframe itself, control surfaces, hinges, linkages, covering, engine, motor, radio, servos, switches, wiring, battery and parts. Check all components before and after each flight. It is essential that you act with the clear understanding that you are solely responsible for all aspects of the model at all times. DO NOT FLY until it is right.
|
| 1.9.1.1. Think Safety |
| When working with Batteries, Electric Models, Motors & Propellers, Chargers & Electrical Devices | |
|
| 1.9.1.2. Power Pack - For VMA-P210X PC9 & Texan II - General Information |
| COPYRIGHT |
Copyright Richmond RC Supply Ltd. All rights reserved.
|
| Tips for Avoiding Common Problems |
We have supplied thousands and thousands and thousands of model aircraft in the past 20 plus years. We're not bragging! We tell you this to give some credibility to our suggested list of tips that follow. In talking to modelers around the world, here is what we have found is the key to... AVOIDING 90% of PROBLEMS that can arise:
|
| 1.9.1.3. Power Pack - For VMA-P210X PC9 & Texan II - Introduction |
Before beginning the Installation Instructions please read the Overview and check off the components provided. Each component is in a labelled parts bag. Please check off the components against the Contents list below. Leave the components in their parts bags for now. Do not remove the components from their parts bags until each is needed during the installation process.
|
| Power Packs - For VMAR Electric Models - Overview |
VMAX Power Packs are intended for modelers who want to purchase a factory designed power system specifically engineered for their VMAR Electric ARF. VMAX Power Packs come complete with Power Module Firewalls, Brushless Motors, Electronic Speed Controls, Li Po Batteries, Propellers and Wiring Harness Sets necessary to get your model in the air with the least amount of mucking around and the maximum amount of performance value.
VMAX Power Packs are perfect for the entire gamut of the modeler spectrum ranging from novices who would rather fly than integrate third party electronics to prosumer RC experts who are short on time and long on experience. For your next VMAR Electric ARF, ask for a VMAX Power Pack to help get you in the air and keep you there!
|
| 1.9.1.4. Power Pack - For VMA-P210X PC9 & Texan II - Contents |
This VMAX Power Pack (#VMM-P210XPP1) contains the following:
|
| Power Module Set - For VMA-P210X PC9 & Texan II - Contents |
This VMAX Power Module Set (#VMM-P210XPM1) consists of the following components:
|
| 1.9.1.5. Power Pack - For VMA-P210X PC9 & Texan II - Installation Instructions |
Consult any labels carefully, particularly the larger WARNING labels. The labels are largely self explanatory. Reading the labels will save you a great deal of time and help prevent damage to your equipment.
|
| 1.9.1.5.1. Stage 1 - Install Power Module - For VMA-P210X PC9 & Texan II |
|
| 1.9.1.5.2. Stage 2 - Install Wiring - For VMA-P210X PC9 & Texan II |
|
| 1.9.1.5.3. Stage 3 - Install Propeller & Battery - For VMA-P210X PC9 & Texan II |
|
| 1.9.1.6. Power Pack - For VMA-P210X PC9 & Texan II - Operating |
Consult any labels carefully, particularly the larger WARNING labels. The labels are largely self explanatory. Paying attention to the operating limits will help prevent damage to your equipment.
We developed this Power Pack as a "system" suitable for your model. We strongly advise against changing any component within this system. If a component requires replacement, ensure you replace it with a new but identical component to that which is being swapped out.
|
| 1.9.1.6.1. Motors - Power Pack Operations - For VMA-P210X PC9 & Texan II |
|
| 1.9.1.6.2. Battery - Power Pack Operations - For VMA-P210X PC9 & Texan II |
|
| 1.9.1.7. Power Pack - For VMA-P210X PC9 & Texan II - No No's & Must Do's |
|
| 1.9.1.8. Support |
On Line, eMail, Fax, Phone, Mail |
| We offer the Best in Support Services. |
We back up our products and our customers with the best support services available. From our industry leading Knowledge Base to information about your Shipment, we've got you covered!
To access our Support Services please:
Your Choice of Support Services that Work for You:
|
| 1.9.1.8.1. Contact Us |
For Sales and other Inquiries |
| Support - Contact Us - Reach our Sales Department by eMail, Fax, Phone or Mail |
Technical Inquiries: Please review the information provided in our Knowledge Base. After checking our Knowledge Base, if you need further assistance please use our Submit A Question service to get a response within 2 Business Days.
Sales Inquiries: Please note that our Sales Department personnel are trained and dedicated to:
Their depth of technical knowledge is about on par with what is shown in our printed sales literature. In most cases, they are working from the same printed advertisements or content from our web site that you are. Asking sales personnel to confirm the size, color and availability of a product is well within their capabilities. However, asking detailed questions about technical issues is not.
Buy our Products:
For All Other Inquiries... please consult the following resources:
|
| 1.9.1.9. Keep Up to Date |
Check Frequently for Updates |
| Support - Stay Current - Check Frequently for Updated &/or Additional Information |
This information is subject to change without notice. When viewing this information in a printed form the printing date will be visible in the lower right corner. Check frequently for updates &/or Additional Information.at www.richmondrc.com, > Enter the Site, > Support Services, follow the links to our Knowledge Base. Review the Table of Contents and search for the name and/or part number of this product.
For automated notification of changes to information contained in our Knowledge Base please register as a Priority Response member and subscribe to our Priority Response Notification Service.
|
| 1.9.2. Power Pack - #VMM-P210XPP1 For VMA-P210X PC9 & Texan II - Additional Information |
In general "Additional" Information is:
Subject to the Conditions of Use, please review the attachments and related articles listed below. |
| COPYRIGHT |
Copyright Richmond RC Supply Ltd. All rights reserved.
|
| 1.10. Power Pack - For VMA-T210X Twin Otter |
| 1.10.1. Power Pack - #VMM-T210XPP1 For VMA-T210X Twin Otter - READ ME FIRST |
PLEASE READ ME FIRST BEFORE PROCEEDING TO ASSEMBLE OR OPERATE THIS PRODUCT |
| LIABILITY DISCLAIMER & COPYRIGHT NOTICE |
LIABILITY DISCLAIMER The authors and/or suppliers and/or disseminaters of this information and/or product expressly disclaim any warranties or representations, either expressed or implied, including but not limited to implied warranties of fitness, accuracy, timeliness or applicability of the information and/or product provided here. In no event will the authors and/or suppliers and/or disseminaters of this information and/or product have any obligation arising from contract or tort, for loss of revenue or profit, or for indirect, special, incidental, consequential or other damages of any sort arising from this information and/or product. In using this information and/or product, the user accepts all responsibility for and all liability associated with such use. PROCEEDING WITH THE USE OF THIS INFORMATION AND/OR PRODUCT INDICATES AGREEMENT WITH AND ACCEPTANCE OF THE LIABILITY DISCLAIMER.
|
| Please Note the following Caution |
CAUTION A Remote Control (RC) model aircraft is not a toy. It is a flying model that functions much like a full size airplane. If you do not assemble and operate model aircraft properly you can cause injury to yourself and others and damage property. DO NOT FLY a model aircraft unless you are qualified. You are ultimately responsible for the mechanical, aeronautical and electrical integrity of any model you fly and all of the components that make up the model including but not limited to the airframe itself, control surfaces, hinges, linkages, covering, engine, motor, radio, servos, switches, wiring, battery and parts. Check all components before and after each flight. It is essential that you act with the clear understanding that you are solely responsible for all aspects of the model at all times. DO NOT FLY until it is right.
|
| 1.10.1.1. Think Safety |
| When working with Batteries, Electric Models, Motors & Propellers, Chargers & Electrical Devices | |
|
| 1.10.1.2. Power Pack - For VMA-T210X Twin Otter - General Information |
| COPYRIGHT |
Copyright Richmond RC Supply Ltd. All rights reserved.
|
| Tips for Avoiding Common Problems |
We have supplied thousands and thousands and thousands of model aircraft in the past 20 plus years. We're not bragging! We tell you this to give some credibility to our suggested list of tips that follow. In talking to modelers around the world, here is what we have found is the key to... AVOIDING 90% of PROBLEMS that can arise:
|
| 1.10.1.3. Power Pack - For VMA-T210X Twin Otter - Introduction |
Before beginning the Installation Instructions please read the Overview and check off the components provided. Each component is in a labelled parts bag. Please check off the components against the Contents list below. Leave the components in their parts bags for now. Do not remove the components from their parts bags until each is needed during the installation process.
|
| Power Packs - For VMAR Electric Models - Overview |
VMAX Power Packs are intended for modelers who want to purchase a factory designed power system specifically engineered for their VMAR Electric ARF. VMAX Power Packs come complete with Power Module Firewalls, Brushless Motors, Electronic Speed Controls, Li Po Batteries, Propellers and Wiring Harness Sets necessary to get your model in the air with the least amount of mucking around and the maximum amount of performance value.
VMAX Power Packs are perfect for the entire gamut of the modeler spectrum ranging from novices who would rather fly than integrate third party electronics to prosumer RC experts who are short on time and long on experience. For your next VMAR Electric ARF, ask for a VMAX Power Pack to help get you in the air and keep you there!
|
| 1.10.1.4. Power Pack - For VMA-T210X Twin Otter - Contents |
This VMAX Power Pack (#VMM-T210XPP1) contains the following:
|
| Wiring Harness Set - For VMA-J210X JU52 Trimotor - Contents |
This VMAR Wiring Harness Set (WHS) contains the following
This VMAR Wiring Harness Set also contains:
|
| Power Module - For VMA-T210X Twin Otter - Contents |
This VMAX Power Module (#VMM-T210PM1) contains the following
|
| 1.10.1.5. Power Pack - For VMA-T210X Twin Otter - Installation Instructions |
Consult any labels carefully, particularly the larger WARNING labels. The labels are largely self explanatory. Reading the labels will save you a great deal of time and help prevent damage to your equipment.
|
| 1.10.1.5.1. Stage 1 - Install Power Module - For VMA-T210X Twin Otter |
|
| 1.10.1.5.2. Stage 2 - Install Wiring Harness Set - For VMA-T210X Twin Otter |
|
| 1.10.1.5.3. Stage 3 - Install Props, Battery & Nose Gear Servo - For VMA-T210X Twin Otter |
|
| 1.10.1.6. Power Pack - For VMA-T210X Twin Otter - Operating |
Consult any labels carefully, particularly the larger WARNING labels. The labels are largely self explanatory. Paying attention to the operating limits will help prevent damage to your equipment.
We developed this Power Pack as a "system" suitable for your model. We strongly advise against changing any component within this system. If a component requires replacement, ensure you replace it with a new but identical component to that which is being swapped out.
|
| 1.10.1.6.1. Motors - Power Pack Operations - VMA-T210X Twin Otter |
|
| 1.10.1.6.2. Battery - Power Pack Operations - For VMA-T210X Twin Otter |
|
| 1.10.1.7. Power Pack - For VMA-T210X Twin Otter - No No's & Must Do's |
|
| 1.10.1.8. Support |
On Line, eMail, Fax, Phone, Mail |
| We offer the Best in Support Services. |
We back up our products and our customers with the best support services available. From our industry leading Knowledge Base to information about your Shipment, we've got you covered!
To access our Support Services please:
Your Choice of Support Services that Work for You:
|
| 1.10.1.8.1. Contact Us |
For Sales and other Inquiries |
| Support - Contact Us - Reach our Sales Department by eMail, Fax, Phone or Mail |
Technical Inquiries: Please review the information provided in our Knowledge Base. After checking our Knowledge Base, if you need further assistance please use our Submit A Question service to get a response within 2 Business Days.
Sales Inquiries: Please note that our Sales Department personnel are trained and dedicated to:
Their depth of technical knowledge is about on par with what is shown in our printed sales literature. In most cases, they are working from the same printed advertisements or content from our web site that you are. Asking sales personnel to confirm the size, color and availability of a product is well within their capabilities. However, asking detailed questions about technical issues is not.
Buy our Products:
For All Other Inquiries... please consult the following resources:
|
| 1.10.1.9. Keep Up to Date |
Check Frequently for Updates |
| Support - Stay Current - Check Frequently for Updated &/or Additional Information |
This information is subject to change without notice. When viewing this information in a printed form the printing date will be visible in the lower right corner. Check frequently for updates &/or Additional Information.at www.richmondrc.com, > Enter the Site, > Support Services, follow the links to our Knowledge Base. Review the Table of Contents and search for the name and/or part number of this product.
For automated notification of changes to information contained in our Knowledge Base please register as a Priority Response member and subscribe to our Priority Response Notification Service.
|
| 1.10.2. Power Pack - #VMM-T210XPP1 For VMA-T210X Twin Otter - Additional Information |
In general "Additional" Information is:
Subject to the Conditions of Use, please review the attachments and related articles listed below. |
| COPYRIGHT |
Copyright Richmond RC Supply Ltd. All rights reserved.
|